 |
| Original Concept |
Ever since I mothballed the shop, I have toyed around with
Google Sketch Up in designing a new one. This process has gone through several
evolutions. Originally, I started off with built in cabinetry,
a long glue up table, and a home for every tool. Unfortunately, the old adage
of measure twice paid off as I had the wrong measurements for the space. I had added about 50 square feet. Back to the drawing board!
I poured over various
magazines and blogs looking at old and new recommendations. I studied plan
books and specialty magazines. I even started looking at kitchen ideas (after all
a mixer or a drill press, it’s all about storage and efficiency). Then the
realization hit me. No one designs workshops for the Jolly Green Giant or his
brother, Lurch. I stand at 6’5”, a 32 inch table hits me mid-thigh! My old
faithful stand up work bench stands 46 inches tall. Any generic plan would
require significant modification. I then realized, I could not do a lot of
built in cabinets if I was going to design this for myself to be comfortable
in. After all, I’ll probably want to sell this place someday. Now there is a
thought of a place to sit down and do some small projects or maybe research
something online, or even play that new DIY video. Overall, this space needs to
be mobile.
Bring on the casters! The shop needs to be set up as a
modular unit. Multiple carts and cabinets which can be wheeled around into
various configurations or shoved in a corner when no need exist. The task seems
daunting when one considers the list of needs:
A Lathe cart Router Table Lumber
Rack Dust Collection
Drill Press cart Table Saw Disk Sander Big Red Tool Box
Miter Saw cart Band Saw More Lighting Work Bench
Plus I need to find homes for the finishes, hand planers,
and all the various bits and tools that don’t fit into the above. In addition, I need to add more electrical outlets. I would
prefer to put them on separate breakers. I’ve also thought of putting in a
dedicated air hose, but that worked better with built in cabinets.
Since my budget and time are limited, I decided to focus first
on the Glue Up / Work Bench and the Drill Press Cart.
My current table is a handyman’s table. But it lacks the ability
to lock in clamps or provide equal access all around. Despite its size, it also
serves as home to the Drill Press, Miter saw, Grinder, and Press. Therefore,
actual working space is only about one and a half square feet. The height is
perfect for me and a step block is kept nearby for any average height helper
that might come along. The new table will need to be narrower but the same
height, plus the addition of vices on either end. By building dedicated homes
for the other tools I hope to have a table just for clamping and gluing.
The final plan for a glue up table / work bench:
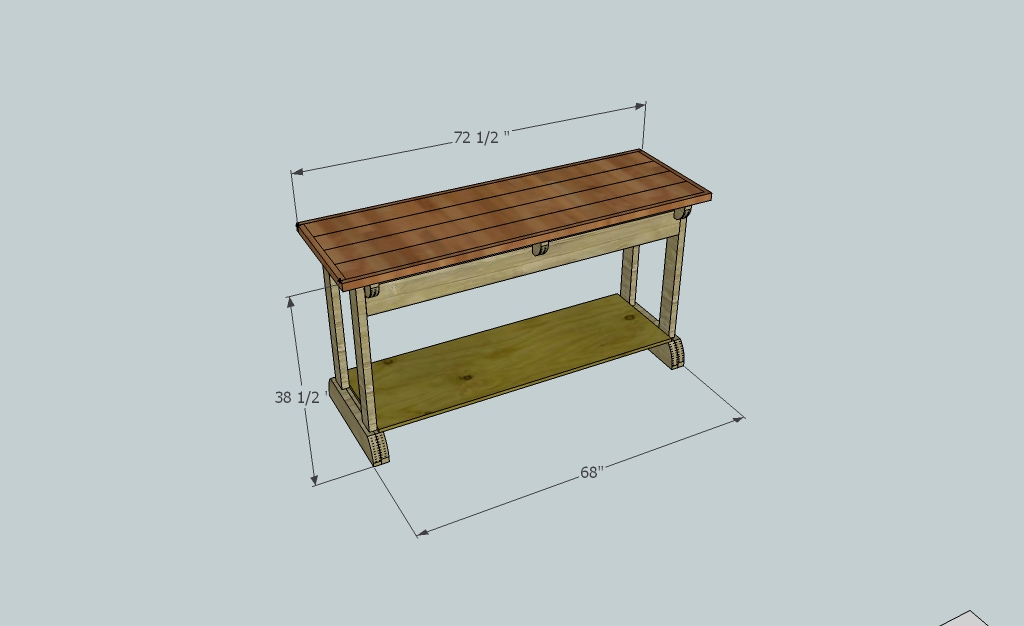 |
| 3inch casters will be added |
 |
| Design inspired by plans found in Shop Notes Vol 22 Is 127 |
 | ||
| The cabinet will be an add on. I'm not a 100 percent sure I like it. |
Drill Press Cart – Currently my drill press resides on my
work bench. The various bits, jigs and fences are scattered around the shop.
The goal here is to consolidate everything to one 2 x 1.5 foot cart. In
addition, four 3 inch casters will be mounted on the bottom. This will put the
press table at a height ranging from 39 to 45 inches, which is perfect for me.
I also wanted to add a place to store the various MDF jigs that I mount to the
table. A small shelf extends from the bottom for this purpose. I plan to use a
bungie cord to secure them.
 |
| 3 inch casters will be added bringing table up to prefect height. |

The cut list is fairly small. One and a half sheets of plywood, three 2x4's, and 6 2x6's for both projects. Add in castors, hinges, and a couple of turned door knobs and these should be ready in no time. ... Famous last words?
I have often said that a plan is just a point to deviate from (military thinking) but I'm going to try and stick to this one. I'll post pics as the units are built.
Until then,
Kevin


