Thursday, January 31, 2013

What is in a name?


Apparently everything! If Shakespeare had the internet, Juliet would have known better!

When I originally started this blog, the idea was to start off on blogger and then move it to a dot com where I could add things like plan down loads, videos, as well as my shop. The name, at that time, didn’t exist anywhere. Then I mothballed it. The blog went dormant.

Now I have returned. As I look at the world of social media, I find that the name, “Homemade Workshop” as well, “The Homemade Workshop” already exist in dot coms, Facebook, Twitter, and many other areas. Funny thing though, no two accounts belong to the same person! 

Maybe it is a good thing. The Homemade Workshop doesn’t really sum up what I do and I don’t think it draws people in. I would like to think that someone out there actually wants to read my blog. So, I need a name that will grab their attention. 

Now don’t go changing your RSS feeds just yet (all two of you). For now, I will continue to publish on this site. However, change for the better, is coming. 

Have an idea for a name? Send it to me. If I use it I’ll send you one of my Wood PensJ. Just to make sure some joker doesn’t steal suggested names, I won’t be publishing any comments until after the change.

Coming next week - The "Glue Up Table" project begins and The Steampunk Pen Update....long overdue!

Until next time,
Kevin 

Tuesday, January 29, 2013

Chalkboard...Part 2

Once the dry fit was complete and all the joints looked good, it was time to begin "distressing" the frame. As I mentioned in part 1, when I researched this process, I came across several different ways to achieve the same results. However, four different methods were repeated often. Since the base color was down to two colors I decided to make a sample board.
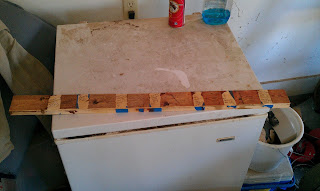
sample finishes
Four of the colors used a base coat of Rustoleum Golden Mahogany Stain. The other four used a base of Minwax Chestnut Stain. All of them had a final finish of one to two coats of satin polyurethane. The difference lied in how the distress marks were highlighted.

After applying the base coat and allowing to dry (in accordance with directions on each can) I used a variety of tools to bang and mar the sample.

Next came the highlighting. The four methods used were as follows:

       1. Rub Black Shoe polish of the surface and then wipe off, allowing it to fill the marks.

       2. Apply a dark stain and immediately wipe off.

       3. Apply a dark gel stain and immediately wipe off.

       4. Re-apply the base coat. Allow to stand for 3 to 5 minutes then blot dry.

As you can see, each method is very similar. Though it was mainly a matter of which product to use. They say that some of the best inventions happen by mistake. So was the case with this project. Holly decided she liked method #1 with a base of the Minwax Chestnut, the best. So out to the shop I went to stain the frame.
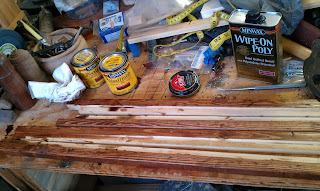
base coat applied
You'll notice, in this shot, there are two cans of stain. One was left over from another project. It was a darker stain (Minwax Pecan). After marring the surface, I wiped it down with a coat of shoe polish. The shoe polish darkened some areas far more than I liked. So I wiped it off and dabbed it with more stain...only I did not realize until I was done that the stain I used was pecan instead of chestnut.

I wiped off the pecan (it had sat for about 5 minutes) to reveal the perfect color, aging, distress that we had been looking for. I showed it to Holly who approved by stating it looked better than the samples! Woohoo...score!

Now some may be wondering why I finished the frame before assembly. I decided to wait on the Poly until after assembly, but in order to avoid messing up the chalkboard, I thought this would be best. Also any scratches made during the assembly would only add to the distressed look. Had I been going for a clean, non distressed finish, I probably would have waited.

On to the clamps...
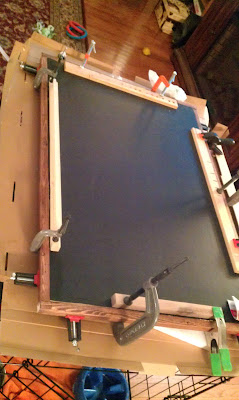
Glue and Clamp

You will recall, from previous post, that I have yet to build the glue up table. Given the size of this project, I had to move it indoors. I think Kaylee may have gotten he snout out of joint (her kennel was the best "table" for this). 

If I do this again, I will use a different joint for the corners. For this purpose a dowel joint was used. On the plans I will be switching it to a lap joint. 

Glue (tightbond II) was applied to the rabbet all around the frame. The chalkboard was then placed and clamped down. Any glue squeeze out was quickly wiped up. Underneath, a substantial amount of squeeze out had dripped onto the cardboard. This was easily removed once dried.

Once fully assembled, I went back over the frame with Minwax Wipe On Poly. Two coats with a light sanding in between. I also noticed that somehow I had missed staining the ends of each frame section and went back and touched those up.

To hang it, I used picture wire. Though I have a feeling will change, to a cleat, in the near future. Apparently, another project has gone on the list, that will require the chalkboard to change position....Wainscoting....for the kitchen.

So how did we fare for this project. Originally, we were looking at a discount store to buy a similar product. The ones we found ranged from $50 to $100. Shopping online I found chalkboards without distressed frames ranging from $40 to $150.00 plus shipping.

As I already had many of the materials used, my cost were:

Chalkboard paint (quart)    $7.50
1x3x96 pine board x 3        $7.11 (I had one left over for future use)
Stain (pint)                          $4.99
 Total                                   $19.60

Had I not already owned the rest my total cost would have been:

Supplies already mentioned           $19.60
Primer (qt)                                      $ 7.64
Polyurethane                                  $ 9.99
brushes / roller                               $ 6.00
24" x 48" x 1/4" plywood                 $ 8.37

Grand Total                                     $51.60

So, if I had to buy everything from scratch, I would break even. However, keep in mind that by building it ourselves, we get the satisfaction of building it as well as getting exactly what we wanted.
In the end, Holly got her chalkboard, I had a lot of fun building it, and we saved about $30 to $50 dollars. I call that a "WIN".

Until next time

Kevin


Thursday, January 24, 2013

Chalkboards! ... Part 1


There lies a fine line between “craft” and “woodworking”. Many times, I am not sure where a project falls. As this project required minimal use of the router and table saw, I’m going to call it “woodworking”. Though, I am well aware that one could easily do this without either tool and achieve similar results.
It started, as many projects do, with Holly and I browsing through our local big box store. She was looking for something to go one the wall. It had to be framed. The frame needed to be distressed. It had to cover a substantial area, therefore it had to be big. One must be able to write on it. We looked at many different items. Everyone we found had a steep price tag. Fifty bucks, seventy-five, a hundred! We could build one ourselves…she said! This soon translated into “Kevin will build it in his shop!” To her credit, she had planned on helping, but I took over.


First, the materials. It turned out that I already had most of the materials needed. I had a 24” x 48” piece of ¼ inch hardwood plywood, primer and brushes, dark stain, various lengths of 2” poplar, and some molding which turned out not to be usable as it had already been finished.
A quick trip over to 3BS (Big Blue Box Store) to get some pine lumber, a second can of stain in a lighter color, and some chalkboard paint.
First we had to prepare the plywood.  Fortunately, one side was already pre-finished (i.e.: sanded smooth) the only real sanding was where the price tag was. A couple of minutes with 150 grit paper knocked off any rough spots.
Next a single coat of primer was painted onto the surface. I used Zinsser latex primer, but any similar product would work.

Latex Primer going on
First Coat Done

The instructions said to wait 4 hours before adding a second coat. In my case it was a week between coats as I started this before heading out the door.
 

As the project sat for a week in my shop, I decided to wipe it down with mineral oil. This was to remove any dust which may have settled on the surface. I would not recommend this practice if you only wait the minimum time between coats. Always refer to the instructions on the can for maximum curing time.

Chalkboard paint going on
First coat chalkboard paint done.


It would take a total of four coats to get a good coverage of the board.

About this time, a decision was made to reduce the size of the project from 24" x 48" plus frame to 24” x 30” plus frame. Furthermore the frame width would also be reduced from 2.5 inches wide down to ¾” wide.

I decided to wait on trimming down the chalkboard and moved on to the frame.

We decided to go with pine for the frame instead of the originally planned poplar. In researching ways to distress the frame I found four different methods to try. Unsure which would yield the best result, I took a scape piece of pine and made 8 sample finishes. Four had a base color of Mahogany and four with a base color of Chestnut.

sample finishes

As Holly studied the sample finishes, I began constructing the frame.

Cutting boards down to proper length.
A pass through the router to cut a
3/4" wide x 1/4" deep rabbet.
A Rip cut to reduce the exposed frame
 to 3/4 inch wide

All four sides went through the same process. Next I trimmed the chalkboard down to 30" long. I taped off the cutting line with painter's tape and made a single pass across the table saw. I forgot to take a picture.

Now it was time for the dry fit.
All the joints look good, Ready for stain and glue.
Distressing the frame and final glue up will have to wait till next week.

Until then,

Kevin