Friday, March 1, 2013

New name, New Site, Same Blog :)

A few weeks ago I wrote a post about changing the name of this blog (read it here). After much debate, We have decided to go with the name:


Along with this name comes a dedicated website and blog. Starting today, all future post will be on that site. You can find us at:


So what is changing you ask? Mainly just the name. The new blog will still focus primarily on woodworking but will also include other ramblings and discoveries as well as a continuation of the Combat Carpenter article.

Also, you can now follow us on facebook. So click right here and give us a "like"


Come check us out, bookmark us, and give us a like. You won't be disappointed!

Wednesday, February 27, 2013

Mr Murphy and his pet gremlins...


Segments Part III: An after action review

In part 1, I talked about the cutting of segments and gluing pairs and quarter rings. In part 2, I completed each of the rings and then screwed up the stack. Wanting to get the most out of the project (from a refresher / learning perspective) I decided to press on. Well the final stopping point did not yield a beautiful bowl. Instead it showed all the flaws and structural failures. From my perspective, it was a win! A lot of times, people tend to stop a project and start over when they realize they have messed up. Makes sense if you are on a time crunch. However, my objective was more educational. So I wanted to see how these early screw ups would affect the final product.


These two shots are opposite sides of the same bowl. Above, you can see the rough edges of segments yet to be turned true. Below, all segments are nicely rounded (and some were too thin). This is the result of the ring shift.


I have since gone back and reviewed Lessons in Segment Woodturning, as well as my small library of books on the subject. Several things could have been done different. One of the obvious is an adjustment to my cross cut sled. Despite a dead on measure with a digital protractor, the angles were slightly off. Instead of 18 segment rings, the sled cut 17 segment rings! This put the angle at 10.58 degrees instead of an even 10 degrees. Looking back at the protractor instructions, it says +/- 0.5 degrees. Note to self – DOUBLE and TRIPLE CHECK EVERYTHING & TEST EVERY JIG BEFORE COMMITTING!

You may have notice the vertical glue joints, on one side, don’t lay in a typical brick fashion but rather a stair stepped pattern. This was due to mistake #2: aggressive sanding. At least one segment in every ring was significantly shorter than the rest. No two short segments were the same length. I spotted this during the first three ring constructs. A slight correction and the rest improved. Too bad it was the primary or “theme” rings. The cause was excessive exposure to the disk sander. A modification to the sanding jig made this flaw go away. Note to self: TAKE THE TIME TO BUILD THE PROPER JIGS

The third and most deadly flaw was the stack. This was the one thing that should have stopped the project cold. The cause, you ask? It was “Impatience”. In other words, I let myself get rushed. I know better. I know that this type of woodworking takes EXTREME patience. Rushing any aspect of this NEVER ends well. I actually made two separate errors here. Either one, by itself, may have been mitigated. However, committing both doomed the project to the fire pit. First, since the project was too large for my vertical press, I simply clamped the stack as seen below with the first set of rings.


Instead, I could have used any of a number of centering jigs (more on that later).  The second was just a bad case of cerebral flatulence. During the stack of the second set of rings, I opted to glue all three at the same time in order to save time during the drying stage. This provided a “slick” surface on either side of three rings (wet glue). As individual clamp pressure was applied by the above clamping method, the rings began to shift in various directions. The result was a set of rings so far off center that recovery would not be possible. To save 12 hours, I destroyed the work that took 30+ hours to complete. Note to self – NEVER GLUE MORE THAN ONE RING AT A TIME IN THE STACK!

The shift occurred between the base and first 3 rings

At this point I knew the project was doomed. Yet, I was quite curious if a change in profile could salvage the part. I even considered reversing the project by making a base for the wide part and a lid for the smaller section (instead of a bowl with the small section as the base). I powered up the lathe one more time to see how far it could go. After about 3 minutes I stopped to check and saw the show stopper.


One side of the segments was barely touched while the other side became so thin it tore a hole. I decided to stop right there. No sanding, no more tools. I conceded defeat to the infamous Murphy and his gremlins. I went ahead and applied a light coat of friction polish to help highlight the flaws. 

One thing that really bothered me was the centering jig. I went to the Segmented Woodturners website and (after renewing my membership) did some research. A few things have changed since I last worked on segments. Somebody found an easier way to make every ring perfectly centered! See video below

I have a feeling woodturnerpro.com is going to get an order from me soon :)

If nothing else, this was a great learning project. I invested about 35 hours in it. It could have been done more efficiently but at this point that is the least of my worries. When I first started segment turning, my very first project was a stave constructed vase. Made of 8 staves, I had messed up one stave and set it aside, then cut a new one. Later I came back to the project, picked up the 8 pieces and started gluing them together. However, when it was time for the last stave, I realized that number 7 was the one I was suppose to have tossed. This resulted in a failed project. That lesson was “note to self #1: MARK ALL SEGMENTS / STAVES.” The very next segment project was an 7 ring bowl that turned out very well. So if history is any indicator, I’m on target for another successful project!

my second ever segment project

Until Next time
Kevin

Thursday, February 21, 2013

Combat Carpenters


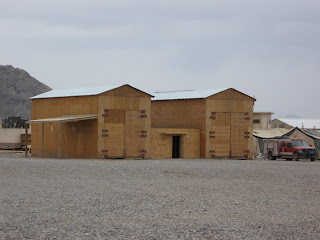
Over the course of my military career, I have had several opportunities to travel to strange lands and live in some less than ideal environments. Sometimes, we lived in tents, ate cold rations out of a foil envelope, and utilized “facilities” that would make one yearn for the “Porta Potty” that bakes in the summer sun. Other times we lived in plywood huts that provided a little more protection from the elements but was still smack dab in the middle of hell. Once, I even stayed in a “subdivision” complete with concrete houses and a cul-de-sac with a basketball goal. Regardless of what the living conditions started off as, they always got a little better. This was not because the Army or the Marines suddenly felt sorry for the troops and air dropped a sofa, but instead was directly due to the fortitude of the Marines, Soldiers, Sailors and Airmen located there. 

See, no matter where one goes, there is an innate need that tells us we have to make it better. We have to make our surroundings more “homey”. As such, the Combat Carpenter is born. He or she rises up out of the grains of sand and scours the area for anything which could be used. Suddenly that stack of wooden pallets disappears. An old crate once used to package litters moves to a new home as it transforms into a desk or makeshift entertainment center. Nails are pulled and straightened out on rocks, as screws back out with the help of a multi tool. What look like the makings of a good bon fire becomes bench swings, desks, loft beds and so much more. The combat carpenter finds things to trade with and acquires a few sheets of plywood which have been in the desert far too long. Before being used, glue (or similar substance) must be applied to prevent the layers from peeling apart. Soon lumber and plywood become more valuable than cash. A box of straight, unused 16 penny nails becomes the mythical treasure under the rainbow. As down time comes, the sounds of hand saws and hammers can be heard. Occaisionally, an experienced Combat Carpenter, with multiple trips under their belt, will produce a cordless circular saw and drill. Sometimes, these experienced ones produce a box of nails or screws, a carpenter’s triangle, or even a tape measure. 

Other items get repurposed as well. The old, warn out cargo strap suddenly becomes the webbed weave for a chair or bench. Dispensed casings find themselves hanging to form wind chimes. Discarded tangles of 550 cord (paracord) shape an intricate web to build makeshift shelving or even a hanging seat or hammock. Then there are the decks. Dimensioned lumber comes in from a long forgotten requisition, submitted by a previous unit, and a deck is born from which more ideas and comforts of home spawn forth. 

By the time the next unit arrives, small sectors of comfort have taken hold in the form of morale areas / tents. As the new unit settles in and the old unit leaves, a new generation begins to dream of how they can improve their surroundings. Once again the sounds of hand saws and hammers fill the air as saw dust joins the never ending blowing sand. 

Dispensed aircraft flare casings are cut to various lengths to form a wind chime

Contractor built, plywood fire station

Deck and benches (car seats too) built at Camp T.Q., Iraq
The little stuffed animal is "Lil B" my version of a traveling gnome

Notice the seat is a web of old cargo straps

How do you put 4 men in a 2 man room? Build a 4 man bunk

Have you been deployed before? Do you have pictures anything built by our troops? Send them to me and I’ll post them in future editions of Combat Carpenter.

Tuesday, February 19, 2013

Flawed but worth Saving!


(segments part 2)


 The weekend started off great. I stacked all the rings Friday night for final glue up. I got the clamps applied and walked away. Saturday, I spent with my beautiful bride as we enjoyed the Broadway play, “Billy Elliot”. Sunday was spent with church and friends and I had Monday off. So Monday morning I walked out to the shop, released the clamps and mounted the project to the lathe. As I rotated the spindle by hand, I noticed something. One side was heavy. I rechecked the mount. It was centered. Then I looked a little closer at the rings…

Call it fatigue, call it forgetfulness, or just bad luck. Whatever one calls it, I did it! The problem with picking up a skill that was once mastered and then forgotten is that one tends to remember the steps but forgets the techniques that go with each step. I should have remembered that I built a clamping jig for projects greater than six inches in diameter. But, I did not ... until it was too late.
During the application of multiple bar clamps, 3 of the rings slid out of position. This shift caused the stack to be lopsided. Had I used the jig, singular pressure would have been applied on all points at once. DOH!

What to do? This project was, from the beginning, a skill refresher. During the ring build, I made a few mistakes but overcame them. What to do now? If this was a commission piece or part of a production run, I would have set it aside, possibly even tossed it into the burn pit. However, neither of those scenarios applied. So far, about 33 hours has been invested. I decided to continue, to see this project to the end. I think it can still be salvaged. If not, I have learned and re-learned some useful techniques. 

The lathe came to life. A noticeable wobble sound filled the room and reverberated across my garage workshop. Quickly I began making light cuts until the wobble slowly turned into the sound a something spinning true. A light hum filled the room and washed out my tinnitus. Ribbons of wood peeled off and fell to the floor.  I stopped the machine frequently (every 2 to 3 minutes) to check progress. One side was ready for sanding, but the other side looked like it had not been touched. Although the top and bottom rings were good all around.  

When I started this, I planned each segment to be an inch wide with a ¾ inch overlap. I wrestled with that as a lot of wood would be wasted. Now it works to my advantage. I went back to the graph paper drawing. In theory, this might just work. There should be enough wood overlapping to offset the shift. There is another issue, the profile is changing. The angle from the top to base is becoming steeper. As I stared at the project, the thought of tossing it in the burn pit became more prevalent. Maybe I should just start over. 

As a sigh of disgust washed over me, I saw something out of the corner of my eye. The project, still on the lathe, not as the bowl I had designed, but as something different. The lathe came back to life as I picked up my gouge and once again began peeling away the layers of wood. Shavings piled at my feet, as their aromas filled the air. The original profile is all but gone. A new purpose for this project is born. It will never be a show piece as it is far from perfect and yet, as I look at it, I can already see more character then many “perfect” pieces could ever have. Oh it is so very flawed. But peel away a few layers, sand a few more, add a little polish, a little buffing and maybe even a slight modification and I am betting it will shine. People are a lot like that. You have perfect pieces that shine but have no character. Then you have others that are full of flaws but just need a chance to show how much character they really have!

This project continues. The piece is still on the lathe waiting for my return. I have already drafted the plans for the modification. With any luck, it will all get done this weekend!

Until then,
Kevin

P.S.  I took several pictures during this process and even shot a short video. As I went to download everything this morning, I found the memory is empty! Only the two pictures I uploaded to Facebook still exist. I am not sure what happened.

Thursday, February 14, 2013

Segments take time...

Part I.


I first talked about segment turnings back when I started this blog, here.

Given my absence, it has been quite some time since I did any segment work. As I looked for my last segment project, I quickly realized that it’s been over three years! So I can’t really blame it on the deployment as that doesn’t cut it with the timeline. It is funny how that happens. One day we try something new, then next thing we know its’ been a few years since we did the old stuff. Well as I sat in the barracks each night looking for something to do, I realized that this would be the perfect time to work on segment projects! So, during my weekend time, I pulled out the cross cut sled and proceeded to spend about an hour at the table saw running just over 100 cuts. The results were several bags of segments.

Back at the barracks, each night I would take out a bag of segments and begin the process of building rings. The first run involved 3 full rings. Each ring consisted of 18 individual segments.

A single segment. 18 segments make 1 ring


Pair glued together and "clamped" with rubber bands


Pairs of segments are glued together to make quarter rings (or close to it).
The two in the back are half rings

Before the full ring could be assembled, all pieces went to the disk sander for final shaping. As I currently do not own a planer, thickness adjustments were also accomplished on the disk sander. Individual rings were then assembled with glue and rubber bands. I then waited 24 hours for the glue to cure.

Set time vs cure time. The instructions on Tightbond II state to allow 24 hours before "stressing" the joint. However the product fully sets in 4 hours. So basically, if the next step was to just add another section, I waited 4 hours. If the piece were to go to the disk sander, I waited 24 hours, as the torque from the sander would "stress" the joints.
Full ring after clamps

With three rings completed it was time to begin stacking them


Three rings stacked.
With all three rings completed, it was time to return to the table saw to start over. The second set would include 72 segments (enough for 4 rings). Unlike the first set, in which all rings were the same diameter, the second set diameters will reduce by half an inch with each ring. So we will have an 8", 7.5", 7.0", and 6.5". The base was also cut and prepped.

As this is more or less a practice piece, I wasn't as concerned with the visual appearance of the wood used. Therefore, I used what was in stock which is primarily Cherry and Walnut with a Bubinga base.

For part 2, I will stack all rings and mount to the lathe. I may even experiment with my first video for the turning part...no promises though. :)

Until then,

Kevin